
Introduction
- Sothern blot is considered the “gold standard” for cccDNA detection because it can separate the cccDNA from protein-free relaxed circular DNA (pf-rcDNA, aka deproteinated rcDNA (DP-rcDNA)) and other HBV DNA species through gel electrophoresis. However, the main disadvantages of conventional Southern blot techniques are their low sensitivity and high labor input.
- Here we present a novel method that uses branched DNA technology to detect HBV DNA resulting in improved sensitivity compared to techniques using DIG-labelled probes. In liver samples from HBV-infected humanized mice, the lower limit of detection is around 20,000 copies of cccDNA.
- This protocol has been tested on DNA extracted via the Hirt DNA extraction method and a modified kit-based HBV protein-free DNA extraction method from HBV-infected cell cultures(1) (NTCP-HepG2, primary human hepatocytes) and human liver chimeric mice(2).
Materials and Reagents
- Gel electrophoresis device (a medium sized chamber ( ca. 12 x 14 cm) has proven useful)
- Standard agarose (for instance LE agarose catalogue # 840004 from Biozyme)
- Gel loading dye (for instance Gel Loading Dye, Purple (6X), no SDS (6X), catalogue # B7025S from NEB)
- TurboBlotter Kit, small, Nytran SPC 0.45 µm, 11 × 14 cm (Cytiva; catalogue # 10416304)
- TurboBlotter Refill, small, Nytran SPC 0.45 µm, 11 × 14 cm, Cytiva; catalogue # 10416306)
- Hybridization oven with a rocking tray
- Hybridization bags (for instance from CosmoBio catalogue # SE-S-1001-EX)
- Impulse heat sealing device for sealing the hybridization bags
- QuantiGene Singleplex Assay kit available from Thermo Fisher #GS0013 (This kit contains the wash buffer components 1 and 2, the lysis mixture, the blocking reagent, the preamplifier solution, the amplifier solution, and the label probe. With the exception of the wash buffer components, the single components cannot be purchased separately at the moment.)
- The 1x wash buffer has to be prepared in advance and can be stored at room temperature (992 mL H2O + 3 mL wash component 1 + 5 mL wash component 2).
- Quantigene DNA probe set DF-10162 was designed to cover three regions of HepAD38-derived viral genome and covers nearly the entire genome with its 50 ZZ pairs.
- Quantigene DNA probe set VF1-12525 is based on another wildtype genotype D HBV strain (plasmid pCHT-9/3091 in reference (3)) and was adjusted for the use in humanized mice (no cross-reaction with human or murine sequences). It also contains 50 ZZ pairs and covers nearly the entire genome.
- Quantigene DNA probe set for the detection of the human mitochondrial gene ND4 (HUMAN MT-ND4 probe set DA-10078). This probe is human-specific.
Note: All listed Quantigene DNA probe sets are commercially available. They were designed to recognize specific HBV viral strains as indicated above. However, because of the broad coverage cross-reactivity with similar viral strains can be expected and has to be determined empirically. Additional probes can be designed upon request.
- CDP-Star Detection Reagents (Cytiva; catalogue # RPN3682)
- Imaging system to detect chemiluminescence
- 1x TAE buffer: 40 mM Tris base, 20 mM acetic acid, 1 mM EDTA
- Depurinating solution: 0.2 N HCl (prepare freshly)
- Denaturing buffer: 0.5 N NaOH, 1.5 M NaCl
- Neutralization buffer: 1.5 M NaCl, 1 M Tris-HCl, pH 7.4
- 20× SSC: 3 M NaCl, 0.3 M sodium citrate
Experimental Procedures
Day -1: DNA Extraction and Sample Preparation
DNA from infected cell cultures or liver tissues should be extracted with a DNA extraction method that enriches protein-free DNA and thus reduces protein-bound DNA, such as polymerase-bound HBV DNA species. This can be achieved through a classical Hirt extraction (described in this protocol: “A Southern Blot Assay for Detection of HBV cccDNA from Cell Cultures” by Cai et al.) or through a total DNA extraction without a proteinase K digestion (-PK; described in “A modified kit-based HBV protein-free DNA extraction from liver tissues and cell cultures for HBV cccDNA Southern blot and qPCR” by Yu et al.).
The amount of input material for DNA extraction depends on the type of material and the infection level. For highly repopulated and infected human liver chimeric mice, for instance, less than 10 mg of liver tissue are needed per lane which corresponds to approximately 3 - 5 µg DNA (as measured with a fluorometer such as the Qubit fluorometer) resulting in approximately 1x10⁶ cccDNA molecules per lane. The detection limit for this kind of tissue has been determined empirically on -PK extracted and T5 nuclease digested cccDNA and was found to be around 2x10⁴ cccDNA copies. For highly infected HepG2-NTCP or primary human hepatocytes, half a million of cells are needed per lane which corresponds to approximately 1 µg DNA.
Note 1: An abundance of HBV DNA intermediates other than cccDNA or pf-rcDNA will result in a grey smear on the blot. Especially when infection levels are high, it is recommended to perform a nuclease digestion before loading the DNA. In case both the upper slow-migrating (pf-rcDNA) and lower fast-migrating band (cccDNA) are to be analyzed, plasmid-safe ATP-dependent DNase is recommended. T5 exonuclease or the combination of Exonucleases I and III are recommended for the analysis of the lower band only.
Note 2: A normalization strategy needs to be chosen before performing the Southern blot experiment. In case of cell culture samples with similar amounts of cells and infection levels per sample, loading the same amount of material might suffice. As an alternative, samples can be normalized via their mitochondrial DNA (mtDNA) content either by including a second probe in the assay (i.e., a probe set for the mitochondrial gene ND4) or by measuring the mtDNA content by PCR. When the samples are digested with a nuclease before loading, it is recommended to measure mtDNA in the undigested samples by PCR and load normalized amounts on the blot because nuclease digestion might partially and irregularly attack mtDNA, too. Normalization is particularly important when working with humanized mice because differences in repopulation levels with human hepatocytes strongly impact the results and human-specific PCR primer/probe or brDNA probes should be used.
Day 1: Agarose Gel Electrophoresis
- Prepare a 1.2% agarose gel in 1x TAE buffer. The size of the gel should correspond to the blotting membrane used later. Make sure all the equipment is clean, rinse well with distilled water before use. Do not add a DNA dye in the gel.
- Mix the samples with loading dye and load on the gel. Load a DNA ladder in the first and last loading well of the gel. A DNA ladder can be prepared from an HBV containing plasmid digested with restriction enzymes to fragments in the desirable lengths.
Note 3: Be very careful when loading the gel because some samples have the tendency to float out of their pockets while loading. As an alternative, the samples can be loaded on the dry gel. When the loading is done, the running buffer will then have to be poured in the chamber very slowly and carefully.
- Run the gel in 1x TAE at 25 V overnight (approx. 16 hours). To avoid overheating and melting of the gel (depending on the room temperature), it is advised to use pre-chilled running buffer and to put cold packs on top of the gel.
Day 2: Blotting and Hybridization
- Disconnect the gel running unit and take out the gel carefully and submerge in a tray containing depurinating solution. Agitate gently for 10 min at room temperature.
- Rinse the gel shortly three times with distilled water.
- Submerge the gel in a tray filled with denaturing buffer and agitate gently for 1 h at room temperature.
- Rinse the gel briefly three times with distilled water.
- Submerge the gel in a tray of neutralization buffer and agitate gently for 1 h at room temperature.
- Rinse the gel briefly three times with distilled water.
- Submerge the gel in a tray filled with 20× SSC and agitate gently for 30 min at room temperature.
- Towards the end of the last incubation step, wet the membrane by immersing in distilled water. Then soak membrane in 20× SSC transfer buffer for 5 min in a separate tray.
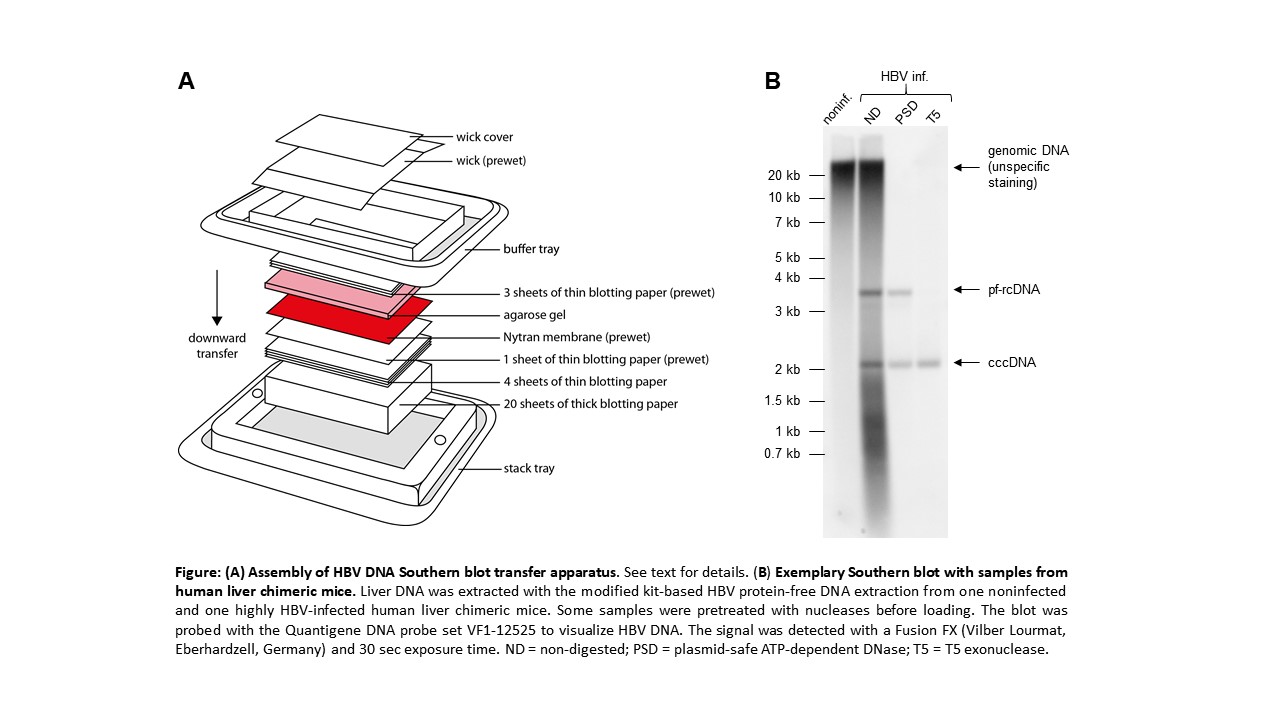
- Set up transfer the transfer device according to the manufacturer´s instruction (see figure).
Note 4: We use downward capillary transfer with neutral buffer conditions for blotting because it is rapid and uses gravity for blotting. There is no need for putting weight on top of the stack, thus reducing the risk of inhomogeneous transfer. Other methods and homemade versions can be used. The TurboBlotter kit comes in different sizes. Make sure the size of the gel matches the blot size. If the gel is slightly bigger than the membrane, it can be trimmed.
-
- First place the “stack tray” of the transfer device on the bench, making sure it is level.
- Place 20 sheets of dry thick blotting paper on the “stack tray”.
- Place 4 sheets of dry thin blotting paper on top of the stack.
- Prewet one sheet of thin blotting paper in 20× SSC and place on the stack.
- Using forceps, place the transfer membrane (Nytran SPC 0.45 µm) on the stack. Don´t touch, put some 20xSSC on top of it.
- Prepare the gel by cutting off the pockets, and if necessary, trim the sides of the gel to make it fit the size of the membrane using a clean scalpel. Place the gel on top of the membrane and make sure there are no air bubbles between the gel and the membrane. Gently roll away possible air bubbles with a serological pipette. Since the transfer uses gravity and goes from top to bottom there is no need to flip over the gel or to put weight on the stack!
- If the gel is smaller than the membrane, cover the excess membrane with thin strips of parafilm to prevent wicking of buffer through the paper rather than the gel.
- Wet the top surface of the gel with 20× SSC, and place 3 sheets of thin blotting paper (pre-soaked in 20× SSC) on top of the gel.
- Attach the “buffer tray” of the transfer device to the bottom tray, using the circular alignment buttons to align both trays.
- Fill the outside ring of the buffer tray with 20× SSC.
- Start the transfer by connecting the gel stack with the buffer tray, using the “buffer wick”, a precut piece of blotting paper, pre-soaked in 20× SSC. Place the wick across the stack so that the wick completely covers the blotting stack, and both long ends extend into the buffer tray. Place the “wick cover” on top of the stack to prevent evaporation.
- Continue the transfer for 3 h. It is okay to let it stand longer. After transferring you should see the loading dye on the membrane.
- Following transfer, mark the right upper corner of the membrane by cutting off a bit and gently wash the membrane in a tray containing 2× SSC for 5 min with gentle agitation at room temperature.
- Place the membrane face-up on a fresh sheet of dry blotting paper (regular Whatman paper) to remove excess of 2× SSC buffer.
- Crosslink the DNA on the membrane in a UV crosslinker chamber with UV light at 254 nm and energy dosage at 120 mJ/cm2.
- Prepare 15 mL of hybridization buffer (5 mL of lysis mixture + 150 µL of blocking reagent + 9.85 mL H2O). Cut open a hybridization bag and place the membrane inside. Close the bag by sealing all sides except one with the heat-sealing device. Then pour the buffer inside and seal the remaining side. Make sure there are no air bubbles trapped in the bag. Place the bag inside the hybridization oven and pre-hybridize for 30 min at 55°C with gently rocking. Don´t let the membrane dry out for the rest of the procedure and always have it facing upwards.
Note 5: We prefer hybridization bags over glass bottles or plastic tubes for two reasons: The hybridization bag will ensure that the membrane is always fully covered in liquid even when using small amounts of buffer. By using a fresh hybridization bag for every step of the procedure, contamination with residual reagents can be avoided resulting in reduced unspecific background staining.
- After pre-hybridization, cut off one corner of the hybridization bag and pour the buffer into a falcon tube, then add 15 µL of the desired DNA probe set(s)to the tube, mix and pour the mixture back into the hybridization bag and seal. Hybridize at 55°C overnight with gently rocking.
Day 3: Amplification and Detection
- Wash the membrane three times with 1x wash buffer for 5 min at room temperature in a tray gently shaking.
- Put the membrane in a fresh hybridization bag and add 10 ml of the preamplifier solution and seal as described above. Incubate at 55°C for 60 min with gentle rocking.
- Wash the membrane four times with 1x wash buffer for 5 min at room temperature in a tray gently shaking.
Note 6: Because excess of pre-amplifiers can result in unspecific background staining, it is advised to perform an additional washing step afterwards (four instead of three times).
- Put the membrane in a fresh hybridization bag and add 10 ml of the amplifier solution and seal as described above. Incubate at 55°C for 60 min with gentle rocking.
- Wash the membrane three times with 1x wash buffer for 5 min at room temperature in a tray gently shaking.
- Prepare the label probe working reagent by adding 10 μL of label probe to 10 mL of amplifier/label probe diluent in a separate falcon. Put the membrane in a fresh hybridization bag and add the reagent and seal as described above. Incubate at 50°C (!!!) for 60 min with gentle rocking.
- Wash the membrane three times with 1x wash buffer for 5 min at room temperature in a tray gently shaking.
- Tip the membrane on Whatman paper to drain excess liquid and put it face up on an open punched pocket. Add 5-10 mL of CDP-Star detection reagent to the membrane and incubate at room temperature for 5 min in the dark.
- Scan the membrane in an imaging system for chemiluminescence, take photos and quantify band intensities. The figure shows an exemplary blot.
References
- Niu C, Livingston CM, Li L, Beran RK, Daffis S, Ramakrishnan D, et al. The Smc5/6 Complex Restricts HBV when Localized to ND10 without Inducing an Innate Immune Response and Is Counteracted by the HBV X Protein Shortly after Infection. PLoS One. 2017;12(1):e0169648.
- Allweiss L, Giersch K, Pirosu A, Volz T, Muench RC, Beran RK, et al. Therapeutic shutdown of HBV transcripts promotes reappearance of the SMC5/6 complex and silencing of the viral genome in vivo. Gut. 2021 Jan 28;
- Nassal M. The arginine-rich domain of the hepatitis B virus core protein is required for pregenome encapsidation and productive viral positive-strand DNA synthesis but not for virus assembly. J Virol. 1992 Jul;66(7):4107–16.