Preparation of OLP peptide pools:
313 peptides in total
-
-
- Spans 15 amino acids (ie. 15-mers)
- Peptide offset: 5 amino acids apart
-
- Peptide pools:
- PreCore/Core = 41 peptides
- X = 29 peptides
- Env – 1 = peptides 1 – 181 (37 peptides)
- Env – 2 = peptides 186 – 376 (36 peptides – 3 peptides not synthesized: 241, 246, 251)
- Pol-1 = peptides 1 – 206 (42 peptides)
- Pol-2 = peptides 211 – 416 (42 peptides)
- Pol-3 = peptides 421 – 626 (42 peptides)
- Pol-4 = peptides 631 – 831 (41 peptides)
Preparation of 50X OLP peptide pool
- PreCore/Core 50x
- 41 peptides x 10 µl /peptide = 410 µl of peptides + 590 ml Aim-V + Prim
- X 50x stimulation pool
- 29 peptides x 10 µl /peptide = 290 µl of peptides + 710 ml Aim-V + Prim
- Envelope 50x stimulation pool
- Env-1 37 peptides x 10 µl /peptide = 370 μl of peptides + 630 ml Aim-V + Prim
- Env-2 36 peptides x 10 µl /peptide = 360 µl of peptides + 640 ml Aim-V + Prim
- Polymerase 50x stimulation pool
- Pol-1 42 peptides x 10 µl /peptide = 420 µl of peptides + 580 ml Aim-V + Prim
- Pol-2 42 peptides x 10 µl /peptide = 420 µl of peptides + 580 ml Aim-V + Prim
- Pol-3 42 peptides x 10 µl /peptide = 420 µl of peptides + 580 ml Aim-V + Prim
- Pol-4 41 peptides x 10 μl /peptide = 410 μl of peptides + 590 ml Aim-V + Prim
Ex Vivo IFNγ ELISpot – Cell prepping
(General Protocol)
Materials:
- 107 frozen PBMCs (per donor; maximum 6 donors per plate)
- 30ml polypropylene tube (one per donor sample)
- Eppendorf tubes
- HBSS medium (Gibco, Ref# 24020-117)
- AIM V medium (Gibco, Ref# 12055-091)
- Knockout serum Replacement (KSR) (Lifetech: 10828028)
- Primocin ( 1ml of 50mg/ml: InvivoGen)
- Human Blood type-AB serum (VWR, CA45001-062)
- 50X HBV overlapping peptides, genotype C (GenScript)
- CEF purified peptide library (GenScript): (USED to monitor treatment effect on unrelated virus-specific T cells)
- DMSO solution (Sigma, Ref# D8418)
- DynabeadsTM Human T-activator CD3/28 (Gibco, Ref# 11131D) (USED as positive/Assay Control)
Day 1: Resting cells (pre-warm media)
- Thaw 107c with HBSS medium (as per protocol) in a 30ml polypropylene tube
a. Minimum count required for experiment: 6 x 10⁶cells/donor - Centrifuge at 300xg for 5mins., aspirate
- Resuspend at approximately 4×10⁶ cells/ml with AIM V (+2% human serum)
- Take counting aliquot for pre-rest counts
a. fix cell concentration if necessary (3.5-4.5×10⁶ cells/ml are suitable as well) - Incubate O/N in 37oC incubator @ 5% CO2
- Coat IPFL plates, fridge O/N in 4oC (as per manufacturer’s, see next pages)
Day 2a: Pulsing cells (pre-warm media)
- 16-18h later, resuspend samples and take counting aliquot for post-rest counts
- Aliquot two Eppendorf tubes with 4.5 x 10⁵cells each (per donor)
a. 1 tube for HBV OLP stimulation, another for DMSO vehicle control - Centrifuge at 300xg for 5mins., aspirate
- Resuspend both tubes with 84µl AIM V (+2% human serum) each
- Pulsing scheme: final volume of 100µl
a. HBV OLP sample: add 2µl of 250µg/ml/peptide per OLP pool (8 pools: 16µl)
i. HBV OLP final concentration: 5µg/ml/peptide
b. DMSO control sample: add 16µl of 19.38% DMSO (in AIM V)
i. DMSO final concentration: 3.1% DMSO (equivalent to OLP sample) - Incubate for 1h in 37oC incubator @ 5% CO2
- Block IPFL plate simultaneously (as per protocol, see next page)
- Centrifuge both tubes of pulsed cells at 300xg for 5mins., aspirate
a. Resuspend cells with 225µl AIM V (no serum) (ie. 2 x 10⁶cells/ml) - Aliquot two Eppendorf tubes with 8 x 10⁶cells each (per donor); centrifuge, aspirate
a. Resuspend cells with 450µl AIM V (no serum) (ie. 4 x 10⁶cells/ml)
b. Pool respectively with pulsed cells
c. Wash tube with another 450µl AIM V (no serum) and pool respectively
d. Final volume:25×106 PBMCs in 1.125ml AIM V (ie. 2 x 10⁶cells/ml) - Aliquot 1.2 x 10⁶cells for CEF controls; centrifuge, aspirate
a. Resuspend cells with 588µl AIM V and 12µl 50x CEF (ie. 2 x 10⁶ cells/ml) - Aliquot 1 x 10⁵cells for CD3/28 controls; centrifuge, aspirate
a. Resuspend cells with 400µl AIM V and 0.4µl CD3/28 (ie. 2.5 x 10⁵ cells/ml)
Day 2b: Plating cells
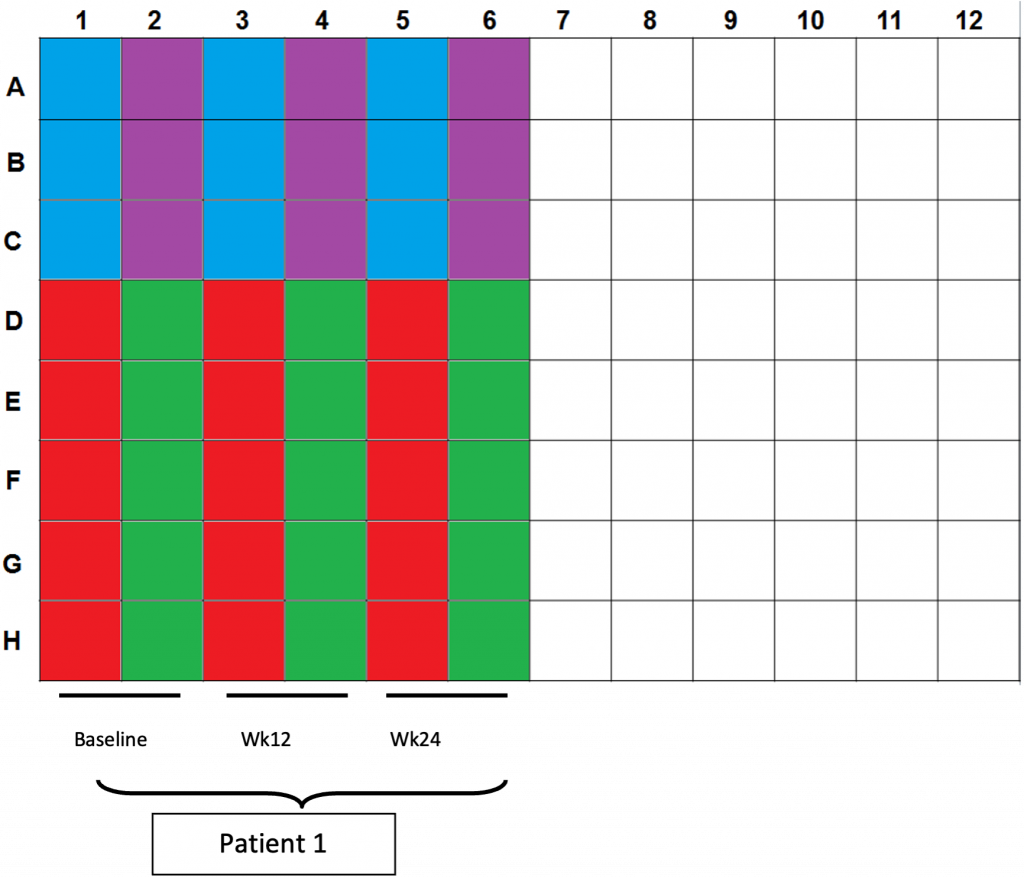
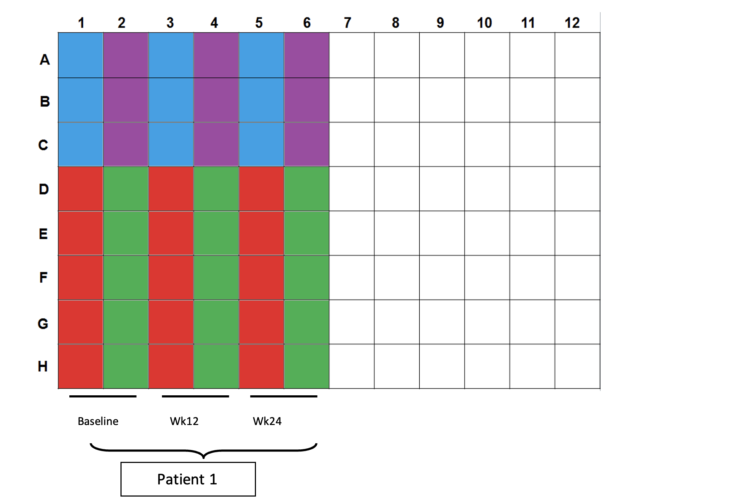
- Color scheme for plating:
a. Blue wells: 100µl CD3/28 controls (2.5×10⁴cells per well)
b. Purple wells: 200/200/100µl CEF controls (4×10⁵cells/2×105cells per well)
c. Red wells: 200µl DMSO controls (4×10⁵cells per well)
d. Green wells: 200µl OLP pulsed cells (4×10⁵cells per well) - Plating totals:
a. CD3/28: 5×10⁴cells in 3 wells
b. CEF: 1×10⁶cells in 3 wells
c. DMSO:2×10⁶cells in 5 wells
d. OLP: 2×10⁶cells in 5 wells - Incubate for 20h in 37oC incubator @ 5% CO2
Day 3: Plate development (20 hours after plating cells)
- Develop plate the next day (as per plate prep protocol)
Ex Vivo IFNγ ELISpot –Plate prepping
Materials:
- 96-well multiscreen PVDF filtration plate: Millipore; Cat. Num. MSIPS4W10
- α-Human IFN-γ capture ab: ImmunoSpot
- α-IFN-γ Biotin ab: ImmunoSpot
- Streptavidin-ALP: MABTEC AB; Code 3310-10
- KPL BCIP/NBT Phosphate substrate (KPL Substrate) (Sera Care: Cat No: 5420-0038)
Day 1: Plate coating
- Prepare coating Ab: Stock 1mg/ml; Final 5µg/ml
- Add 25µl of IFNγ capture Ab in 5ml of sterile PBS (for 45 wells)
- Activate wells by adding 15µl of 35% ethanol
NOTE: While activating the well with ethanol, don’t let it sit. No well, should be exposed to ethanol for more than 60 sec. - Wash the plate 6 times with sterile water
- Place 100µl of coating Ab solution into each well
- Parafilm and incubate plate at 4oC O/N
Day 2: Setting up plate
- Wash the plate 6 times with sterile water
- Make blocking solution, AIM V – 10% KSR
- Add 45ml of AIM V to 5ml of KSR
- Add 100µl blocking solution into each well
- Incubate the plate at room temperature for at least 30 minutes
- Remove via flicking
- Add PBMCs to the plate after pulsing (as per Cell prep protocol, Page 1)
- Incubate the plate @ 37oC O/N
Day 3: Plate development (24 hours after plating cells)
- Prepare α-IFN-γ Biotin: Stock: 0.5mg/ml; Final: 0.5µg/ml
- Add 5µl anti-human IFNγ mAb Biotin in 5ml sterile PBS (for 45 wells)
- Wash the plate 6 times with PBS
- Place 100µl of 0.5ug/ml α-IFN-γ solution into each well
- Incubate plate at room temperature for 2 hours
- Prepare Streptavidin-ALP: Stock: 0.5µg/ml; Final: 0.25ng/ml
- Add 5µl Streptavidin-enzyme in 5ml sterile PBS (for 45 wells)
- Wash the plate 6 times with non-sterile PBS
- Add Streptavidin. Place 100µl solution into each well
- Incubate the plate at room temperature for 30 minutes
- Wash the plate 6 times with non-sterile PBS
- Add 50µl of KPL Substrate solution into each well.
- Incubate in the dark at room temperature for 20 minutes.
- Remove plate underdrain and wash underside with running water, flick, and repeat ~10 time; flick dry as much as possible
NOTE: Avoid flicking on paper towels to minimize dust/particulates in wells - Dry ~20-30mins in the BSC (with underside upwards) in the dark
- Scan and count plates